Live Chat, Facebook and SMS/MMS
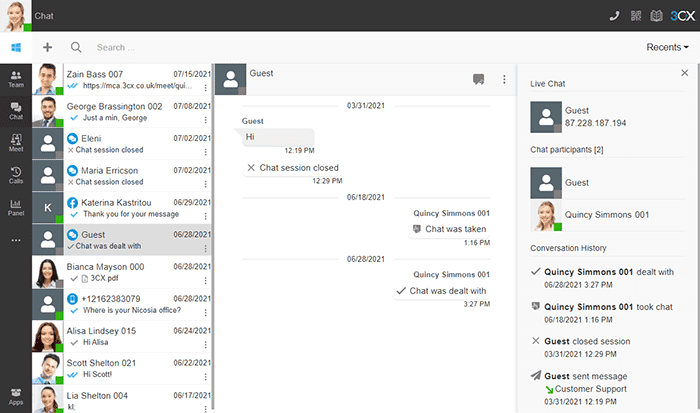
The 3CX chat feature doesn’t only allow employees to chat and share files with each other. It also enables customer service agents to easily respond to queries sent via live chat, Facebook messaging and SMS/MMS. All from the same user-friendly interface.

Start a chat
Click “Chat” > “+” and select “Start a Chat” or “Create Group Chat”.
Select the extension(s) to start chatting.
Receiving customer chat messages
Incoming chat messages will be routed to specific queues or extensions. The type of chat conversation is highlighted by a specific icon; Website live chat ![]() , Facebook
, Facebook![]() , and SMS/MMS
, and SMS/MMS ![]() . Internal chat messages are not specified by any icon.
. Internal chat messages are not specified by any icon.
Chats are visible to all agents who are in the assigned queue. The administrator can configure the polling strategy of the queue (e.g. the first agent to answer a chat, the top 3 agents, etc).
Any agent can respond and see the ongoing conversation until one agent takes ownership. To do this:
- Click on the chat conversation, then click on the “Take”
 icon in the top right corner.
 - You will now be the sole owner of this conversation; other agents no longer have access to it.
Transferring a chat
At any point during the conversation, you may decide that the issue should be handed off to another agent to resolve.

- On the conversation preview, click the menu
 icon and select “Transfer”.
 - OR click the “Transfer”
 button in the top right of the conversation window.
- Search by name or extension number for the agent you want to transfer to.
- Click on the extension and the chat will be transferred. You will no longer be able to view the conversation.
Resolve/Archive a chat
Archiving a chat removes the conversation from the main or “Recents” view. You may wish to do this if a customer becomes unresponsive or you wish to refer back to the chat at a later date.
- On the chat preview or in the chat window, click the menu
 icon and select “Archive”.
 - The conversation will be removed from the main chat window. To access archived chats:
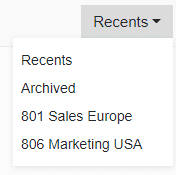
- Click on the drop-down menu in the top right corner and select “Archived”.

From here you can transfer, unarchive or resolve the chat by clicking on the menu icon in the chat preview or window.
- You can also permanently delete the chat .
If the customer’s query has been resolved, you can easily mark the conversation as dealt with.
- On the chat preview, click the menu
 icon and select “Dealt with”.
 - OR click the “Dealt with”
 button in the top right of the chat window.
 - The conversation will be moved to the “Archived” chats.
Additional chat actions
There are various chat actions available to help you efficiently manage your conversations and gather additional details about customers.
End chat session
Only available for website live chat, this function closes the chat session and notifies the customer that the chat has ended but keeps the conversation in the main or “Recents” tab.
- Click on the menu
 button in the top right of the main chat window.
 - Select “End chat session”.
Block anonymous user
This option is only available for website live chat. This feature is useful for weeding out troublesome, abusive or time-wasting chat messages.
- Click on the menu
 button in the top right corner.
 - Select “Block anonymous user”.
- The user’s IP will be blocked and they will no longer be able to access website live chat.
View user information
Depending on the type of chat, you can view additional information such as conversation history.
- Click on the menu
 button in the top right corner.
 - Select “Information”.
Email or add live chat user as a contact
You can send an email to or add a live chat user as a contact during or after your conversation.

- In the chat window, click on the menu
 button.
 - Select “Information”.
- Click the “Email” or “Add” button to perform the desired action.
Send images and files
You can send files to the user by either drag and drop or by clicking the “Attach document” ![]() icon in the lower right corner. The following files are supported:
icon in the lower right corner. The following files are supported:
- Documents: Acrobat (PDF), MS Office (DOC, DOCX, PPT, PPTX, XLS, XLSX), plain and rich text (TXT, RTF).
- Images: JPG, PNG, GIF, BMP, WEBP, TIFF, and HEIF.
Elevate the chat to a call (internal chat and website live chat only)
There may be instances where a voice or video call is needed in order to assist a website visitor or colleague. To do this for live chat, you must first take ownership of the chat by clicking the “Take” ![]() button.
button.
You can then request the customer to initiate a call by clicking the call or video icon at the top of the chat box.
Note: This option must be enabled by your administrator.
To elevate internal chat conversations to a voice or video call, click the call or video icon at the top of the chat.

Chat settings
Go to “Settings > Chat” to configure:
- “Notifications” – select to show chat toaster and/or web notifications
- “Play chat notification” – enable and select a personalized notification sound.
Related Articles
The 3CX iOS App
Work remotely from your home, by the pool or at your friendly neighborhood cafe; the 3CX app for iOS let’s you take your office extension along for the ride no matter the destination! Access your company phonebook, make and receive calls, chat with ...What is A2P 10DLC?
In 2021, all major US carriers — T-Mobile, AT&T, and Verizon came together to introduce a new set of regulations called A2P 10DLC. These 10 digit long codes were developed and sanctioned specifically for businesses that rely on bulk text messaging to ...Video Conferencing for Advanced Users
This guide is about 3CX’s advanced web conferencing features. For more information on creating a conference, please visit our video conferencing guide. Managing a Video Conference “Turn Camera On/Off” – Toggle on/off to enable/disable camera. ...Video Conferencing
3CX includes a powerful video conferencing solution that allows for effective, face to face communication and collaboration with colleagues and customers no matter where they are. With 3CX, your invitees can seamlessly join meetings with absolutely ...